C语言基础 乘法逆元 信息安全算法基础 操作系统基础 x86汇编基础 信息论与编码
这篇文章是电子科技大学,计算机科学与工程学院,网络空间安全专业的《信息安全基础综合设计实验》的总结。本人将它视为复习总结,读者可以当作学习使用 C++ 编写密码学函数和使用密码学库的入门资料。由于包含了课程作业答案,所以明年的这个时候应该会隐藏文章。
数论基础
模指数运算
主要就是分治算法,避免计算过程中溢出。递归的写法要注意堆栈溢出,因为当 e 不等于 0 的时候,每一层递归都会有两个分叉,也就是 2^32 次方的话,就会有 2^32 次方分叉,程序非常慢。
1
2
3
4
5
6
7
8
9
10
11
12
unsigned int mod_exp (unsigned int a,unsigned int e, unsigned int n) if (e==0 ) { return 1 ; } if (e%2 == 0 ) { return mod_exp (a,e/2 ,n)%n*(mod_exp (a,e/2 ,n)%n)%n; } else { return mod_exp (a,e/2 ,n)%n *(mod_exp (a,e/2 ,n)%n)%n*(a%n)%n; } }
那么还是采用 power 函数,那么就只有线性复杂度了。
1
2
3
4
5
6
7
8
9
10
11
12
13
unsigned int mod_exp (unsigned int a,unsigned int e, unsigned int n) if (e==0 ) { return 1 ; } if (e%2 == 0 ) { return (unsigned int )pow (double (mod_exp (a,e/2 ,n)%n),2 )%n; } else { return (unsigned int )pow (double (mod_exp (a,e/2 ,n)%n),2 )%n*(a%n)%n; } }
另外,用循环编写也是可以的,只需要把指数当作二进制,从低位开始扫描,遇到 0 就不处理,遇到 1 就翻倍,然后每次扫描都通过之前的 n 次方的值,计算 2n 次方的值。二进制数的话,就通过 mod 2 和 /2 去实现。
1
2
3
4
5
6
7
8
9
10
11
12
13
14
unsigned int mod_exp (unsigned int a,unsigned int e, unsigned int n) unsigned int val= a%n; unsigned int res =1 ; while (e!=0 ){ if (e%2 ==1 ){ res = res*val%n; } val = (val%n)*(val%n)%n; e/=2 ; } return res; }
Eratosthenes 素性检测
通过 Eratosthenes 找出 { 2 , 3 , ⋯ , n 1 / 2 } \left\{ 2,3,\cdots ,n^{1/2} \right\} { 2 , 3 , ⋯ , n 1/2 }
1
2
3
4
5
6
7
8
9
10
11
12
13
14
15
16
17
18
19
bool is_prime[100000 ];bool Eratosthenes (unsigned int a) memset (is_prime, 1 , 100000 *sizeof (bool )); if (a==1 || a==0 ) return false ; unsigned int sqr = (unsigned int )sqrt (double (a)); int i; for (i = 2 ;i <= sqr;i++){ if (!is_prime[i]) continue ; for (int j = 2 ; i*j<=sqr;j++){ if (is_prime[i*j]) is_prime[i*j] = false ; } if (a%i==0 ){ return false ; } } return true ; }
Miller-Rabin 素性检测
任意的素数都可以表示成 2 k q + 1 , k ⩾ 0 , q 为奇数 2^kq+1,k\geqslant 0,q\text{为奇数} 2 k q + 1 , k ⩾ 0 , q 为奇数 n n n
a n − 1 m o d n = a 2 k q m o d n = 1 , 1 < a < n − 1 a^{n-1}\bmod n=a^{2^kq}\,\,\bmod n=1, 1<a<n-1
a n − 1 mod n = a 2 k q mod n = 1 , 1 < a < n − 1
然后由因式分解。
0 = a 2 k q − 1 = ( a 2 k − 1 q − 1 ) ( a 2 k − 1 q + 1 ) = ( a q − 1 ) ∏ j = 1 k ( a 2 j − 1 q + 1 ) m o d n 0=a^{2^kq}-1=\left( a^{2^{k-1}q}-1 \right) \left( a^{2^{k-1}q}+1 \right) =\left( a^{q}-1 \right)\prod_{j=1}^k{\left( a^{2^{j-1}q}+1 \right)}\,\, \bmod n
0 = a 2 k q − 1 = ( a 2 k − 1 q − 1 ) ( a 2 k − 1 q + 1 ) = ( a q − 1 ) j = 1 ∏ k ( a 2 j − 1 q + 1 ) mod n
所以对于给定的 a,如果 n 是素数,那么一定满足一下条件之一:
a q m o d n = 1 a^q \bmod n = 1 a q mod n = 1 ∃ j , 1 ⩽ j ⩽ k , a 2 j − 1 q = n − 1 m o d n \exists j, 1\leqslant j\leqslant k,a^{2^{j-1}q}=\,\,n-1 \bmod n ∃ j , 1 ⩽ j ⩽ k , a 2 j − 1 q = n − 1 mod n
所以,如果都不满足这两个条件,那么 n 必然不是素数。但是如果满足也不一定是素数 。
1
2
3
4
5
6
7
8
9
10
11
12
13
14
15
16
17
18
19
20
bool Miller_Rabin (unsigned int n,unsigned a) unsigned int tmp = n-1 ; unsigned int k,q; k=0 ; while (tmp%2 !=0 ){ k++; tmp/=2 ; } q=tmp; if (mod_exp (a,q,n) == 1 ) { return true ; } for (int j=1 ;j<=k;j++){ if (mod_exp (a,mod_exp (2 ,j-1 ,1 )*q,n)==n-1 ){ return true ; } } return false ; }
乘法逆元
详细过程参考笔记 ,实际考试的时候大概率记住最好。这也是没办法的事情,考试主要是记忆已有的东西。记住基本递归形式,记住每次回溯的方式。特别注意溢出的问题,特别是采用 unsigned int 时做减法
1
2
3
4
5
6
7
8
9
10
11
12
13
14
15
16
17
18
19
20
21
22
23
24
25
26
27
28
void extgcd (unsigned int a, unsigned int b, int &x, int &y) if (a==0 ){ x = 0 ; y = 1 ; return ; } extgcd (b%a,a,x,y); int t = x; x = y - b/a*x; y = t; } unsigned int gcd (unsigned int a, unsigned int b) if (a%b == 0 ){ return b; } return gcd (b,a%b); } int reverse (unsigned int a, unsigned int n) if (!a||!n||gcd (a,n)!=1 ){ return 0 ; } int x,y; extgcd (a,n,x,y); return x%n; }
考试之前记得记一记。
伪随机数生成器
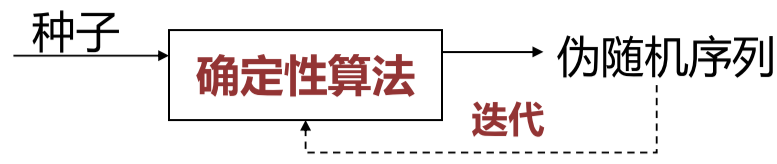
随机数具有随机性:均匀分布 、难以重现 ,机器生成的一般时伪随机数。伪随机数生成器通过种子和确定性算法,生成不断迭代的伪随机序列,具有伪随机性 、可重现
一般 C 语言生成随机数都是先 srand(seed) 设置种子,最常见的是 srand(time(NULL))
LCG
线性同余伪随机数生成器的基本结构是
x i + 1 = a x i + c m o d m x_{i+1}=ax_i+c\,\,\bmod m
x i + 1 = a x i + c mod m
a 叫做乘数
c 叫做增量。
m 叫做模数。
x 0 x_0 x 0
它生成的伪随机数具备以下性质:
不具备全周期性质。循环的长度不一定为 m-1,可能生成的随机数只有少数几个。
容易根据之前的随机数 x 0 , x 1 , ⋯ , x i − 1 x_0,x_1,\cdots,x_{i-1} x 0 , x 1 , ⋯ , x i − 1 x i x_i x i
所以线性同余位随机数生成器不具备可证明的安全性 ,可证明安全性指的是 可以将区分伪随机数和随机数规约为解决数学难题
BBS
BBS (Blum Blum Shub) 伪随机数生成器具备可证明安全性,基于大数难分解 困难问题(给定 n,无法确定 n 的因子),结构如下:
x i = x i − 1 2 m o d n { n = p q , p ≡ q ≡ 3 m o d 4 x 0 = s , g c d ( s , n ) = 1 x_i=x_{i-1}^{2}\bmod n \\
\begin{cases}
\,\,n=pq, p\equiv q\equiv 3\bmod 4\\
x_0=s,\mathrm{gcd}\left( s,\mathrm{n} \right) =1\\
\end{cases}
x i = x i − 1 2 mod n { n = pq , p ≡ q ≡ 3 mod 4 x 0 = s , gcd ( s , n ) = 1
然后从 x 0 , x 1 , ⋯ , x i x_0,x_1,\cdots,x_i x 0 , x 1 , ⋯ , x i i + 1 i+1 i + 1 x 0 x_0 x 0
1
2
3
4
5
6
7
8
9
10
11
12
13
14
15
16
17
18
19
20
21
22
23
24
25
26
27
28
29
30
31
32
33
34
35
36
37
38
39
40
41
42
43
44
45
unsigned int least_bit (unsigned int n) return n&0x0001 ; } unsigned int even_check_bit (unsigned int n) unsigned int cnt = 0 ; while (n!=0 ){ cnt+=n%2 ; n /=2 ; } if (cnt%2 ==0 ){ return 0 ; } return 1 ; } unsigned int odd_check_bit (unsigned int n) return 1 - even_check_bit (n); } unsigned int bbs (int flag) unsigned p,q,n,s,res; p=11 ,q=19 ,s=3 ,n=p*q; res = 0 ; unsigned int i; for (i=0 ;i<32 ;i++){ s = (s%n)*(s%n)%n; unsigned int b; switch (flag){ case 0 : b = least_bit (s); break ; case 1 : b = odd_check_bit (s) ; break ; case 2 : b = even_check_bit (s); break ; } res=res*2 ; res+= b; } return res; }
另外,这里老师还介绍了微秒级别的获取时间的函数 gettimeofday,主要记得它的参数类型是 struct timeval:
1
2
3
4
5
6
7
8
9
10
11
int main () struct timeval start,end; gettimeofday (&start,NULL ); unsigned int a = (unsigned int )-1 ; cout<<bbs (0 )<<endl; cout<<bbs (1 )<<endl; cout<<bbs (2 )<<endl; gettimeofday (&end,NULL ); float time_use = (end.tv_sec - start.tv_sec) * 1000000 + (end.tv_usec - start.tv_usec); cout<< time_use<<endl; }
不过,读者可以在 Linux 系统下用 man 命令获取相关信息。
非对称密码
从这一节开始,我们不再自己写算法,而是学会使用 openssl 库来实现密码学函数。
大数运算
大数运算时最基础的 openssl 内容,用于处理任意大的整数。在此之前,请检查是否按照密码学库,运行 sudo apt-get install libssl-dev。编译时需要引入库:gcc/g++ <源文件> -o <可执行文件> -lcrypto。这里主要使用 <openssl/bn.h>。
创建和释放
1 2 3 4 5 6 7 8 9 10 11 #include <openssl/bn.h> BIGNUM *BN_new (void ) ; void BN_init (BIGNUM *) void BN_clear (BIGNUM *a) void BN_free (BIGNUM *a) void BN_clear_free (BIGNUM *a)
下面是 CTX 也就是 context 类型,用于计算时暂存上下文,下面时创建和释放的方法。
1 2 3 #include <openssl/bn.h> BN_CTX *BN_CTX_new (void ) ;void BN_CTX_free (BN_CTX *c)
基本赋值
1
2
3
4
5
6
7
8
9
int BN_zero (BIGNUM *a) int BN_one (BIGNUM *a) int BN_bn2bin (const BIGNUM *a, unsigned char *to) BIGNUM *BN_bin2bn (const unsigned char *s, int len, BIGNUM *ret) ;char *BN_bn2hex (const BIGNUM *a) char *BN_bn2dec (const BIGNUM *a) int BN_hex2bn (BIGNUM **a, const char *str) int BN_dec2bn (BIGNUM **a, const char *str)
int 返回值 1 表示成功。转二进制或者十六进制的返回字符指针。
BN_bn2bin 中 to 字符串的长度必须是 BN_num_bytes(a)
如果 *a 是 NULL,就会函数分配内存。
转字符串的函数会返回 NULL 结尾的字符串。
注意十六进制转 BIGNUM 是不带前缀 0x 的。
基本运算
r 表示结果,部分函数需要 ctx。BN_div 中 dv=a/d,rem=a%d,除了最简单的加减,最后一个参数都是 ctx。
1
2
3
4
5
6
7
8
9
10
11
int BN_add (BIGNUM *r, const BIGNUM *a, const BIGNUM *b) int BN_sub (BIGNUM *r, const BIGNUM *a, const BIGNUM *b) int BN_mul (BIGNUM *r, BIGNUM *a, BIGNUM *b, BN_CTX *ctx) int BN_sqr (BIGNUM *r, BIGNUM *a, BN_CTX *ctx) int BN_div (BIGNUM *dv, BIGNUM *rem, const BIGNUM *a, const BIGNUM *d, BN_CTX *ctx) int BN_mod (BIGNUM *rem, const BIGNUM *a, const BIGNUM *m, BN_CTX *ctx) int BN_exp (BIGNUM *r, BIGNUM *a, BIGNUM *p, BN_CTX *ctx) int BN_gcd (BIGNUM *r, BIGNUM *a, BIGNUM *b, BN_CTX *ctx) BIGNUM *BN_mod_inverse (BIGNUM *r, BIGNUM *a, const BIGNUM *n, BN_CTX *ctx) ;
上面的许多运算都可以加入模运算,倒数第二个参数是模。
1 int BN_mod_add (BIGNUM *ret, BIGNUM *a, BIGNUM *b, const BIGNUM *m, BN_CTX *ctx)
比较函数
1
2
3
4
5
6
int BN_cmp (BIGNUM *a, BIGNUM *b) int BN_ucmp (BIGNUM *a, BIGNUM *b) int BN_is_zero (BIGNUM *a) int BN_is_one (BIGNUM *a) int BN_is_word (BIGNUM *a, BN_ULONG w) int BN_is_odd (BIGNUM *a)
综合运用
虽然 BIGNUM 内置了乘法逆元、模指数运算等函数,但是我们仍然可以自己实现一个自己的乘法逆元:
1
2
3
4
5
6
7
8
9
10
11
12
13
14
15
16
17
18
19
20
21
22
23
24
25
string big_mod_exp2 (string a, string e, string m) BIGNUM *a1, *e1, *m1; BN_CTX *ctx = BN_CTX_new (); a1 = e1 = m1 = NULL ; BN_dec2bn (&a1, a.c_str ()); BN_dec2bn (&e1, e.c_str ()); BN_dec2bn (&m1, m.c_str ()); BIGNUM *t = BN_new (); BIGNUM *res = BN_new (); BN_one (res); BN_mod (t, a1, m1, ctx); while (!BN_is_zero (e1)) { if (BN_is_bit_set (e1, 0 )) { BN_mod_mul (res, res, t, m1, ctx); } BN_rshift1 (e1, e1); BN_mod_mul (t, t, t, m1, ctx); } return string (BN_bn2dec (res)); }
比较意外的是,自己实现的似乎比内置的更加高效,可能是占用内存更多一些,内置的占用内存更少一些。
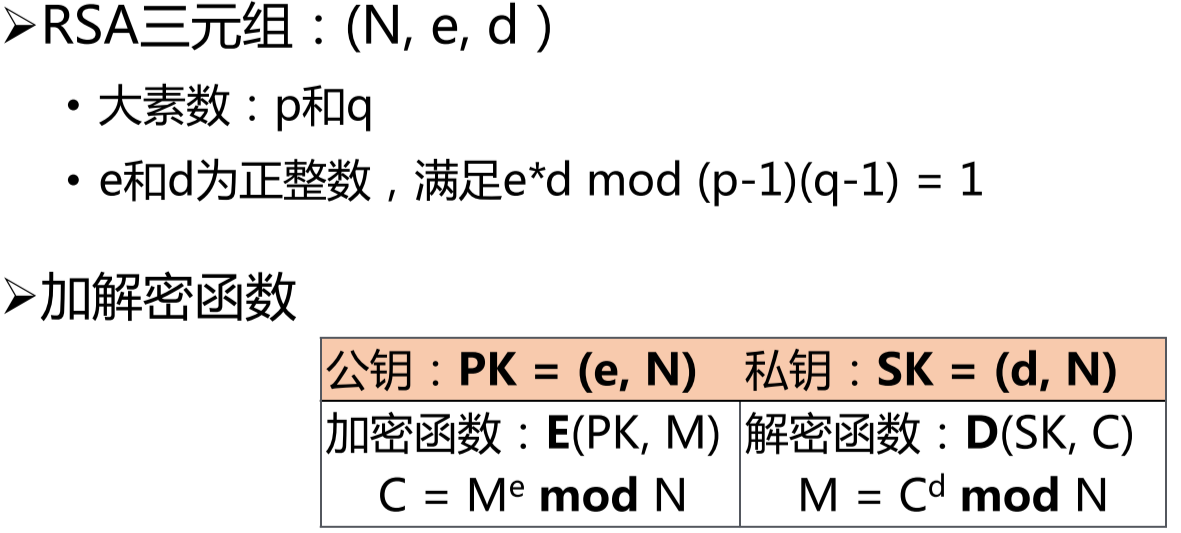
RSA 加密
算法原理很简单,不赘述。
直接使用
首先看生成密钥的方式,RSA_new 并不会生成一个直接可以用的密钥,还需要赋值。赋值的方式一种是分别对参数赋值,类似于 key->n = BN_bin2bn(rsaN, n_len, NULL); key->d = BN_bin2bn(rsaD, d_len, NULL); key->e = BN_bin2bn(rsaE, e_len, NULL);。另外一种就是下面的函数。
1 2 3 4 5 6 7 8 9 10 11 12 13 14 15 16 17 18 19 20 #include <string.h> #include <openssl/bn.h> #include <openssl/rsa.h> #include "iostream" using namespace std;int main () unsigned char a[]="asdfg123sda/.," ; RSA *key = RSA_new (); key = RSA_generate_key (1024 ,0x100001 ,NULL ,NULL ); unsigned char * cipher = (unsigned char *)malloc (RSA_size (key)); unsigned char * res = (unsigned char *)malloc (RSA_size (key)); int cipher_len = RSA_public_encrypt (strlen ((char *)a),a,cipher,key,RSA_PKCS1_PADDING); int plain_len =RSA_private_decrypt (cipher_len,cipher,res,key,RSA_PKCS1_PADDING); cout<<string ((char *)res,plain_len)<<endl; return 0 ; }
注意字符串的长度,因为加密和解密函数的字符串是没有 NULL 结尾的,创建 string 需要指定长度。
接着最常用的函数如下,具体的参数要求可以查看文档。
1 2 3 4 5 6 7 8 9 10 11 12 13 14 15 16 17 18 #include <openssl/rsa.h> #include <openssl/engine.h> RSA * RSA_new (void ) ;void RSA_free (RSA *rsa) int RSA_public_encrypt (int flen, unsigned char *from, unsigned char *to, RSA *rsa, int padding) int RSA_private_decrypt (int flen, unsigned char *from, unsigned char *to, RSA *rsa, int padding) int RSA_private_encrypt (int flen, unsigned char *from, unsigned char *to, RSA *rsa,int padding) int RSA_public_decrypt (int flen, unsigned char *from, unsigned char *to, RSA *rsa,int padding) int RSA_sign (int type, unsigned char *m, unsigned int m_len, unsigned char *sigret, unsigned int *siglen, RSA *rsa) int RSA_verify (int type, unsigned char *m, unsigned int m_len, unsigned char *sigbuf, unsigned int siglen, RSA *rsa) int RSA_size (const RSA *rsa) RSA *RSA_generate_key (int num, unsigned long e, void (*callback)(int ,int ,void *), void *cb_arg) ;int RSA_print_fp (FILE *fp, RSA *x, int offset)
值得一提的是 RSA_print_fp 标准输出的东西,模数,公开的 e,私密的 d,两个大素数。后面的参数估计是为了简化运算,提前算出来的值。
1
2
3
4
5
6
7
8
9
10
11
12
13
14
15
16
17
18
19
20
21
22
23
24
25
26
27
28
29
30
31
32
33
34
35
36
37
38
39
40
41
42
43
44
45
46
47
48
49
50
51
52
RSA Private-Key: (1024 bit, 2 primes) modulus: 00:c6:42:9c:69:e2:ef:6d:ed:9e:c6:2d:4b:ea:43: 35:d9:94:14:e2:b0:e9:4e:66:24:c4:5b:df:96:23: ef:5d:67:46:7c:7e:ab:ff:05:5d:17:de:3f:00:d1: 67:f3:6a:b0:0c:89:f2:40:b9:11:0a:7d:c6:3a:23: 91:82:f8:c7:75:ce:3c:8c:19:f0:3e:7e:a9:fa:07: a5:87:05:81:3e:51:cc:88:9e:0a:e1:34:50:77:34: bb:c1:9c:bf:75:d8:54:18:fa:db:c6:74:fc:a3:60: cc:44:fb:60:ea:b9:f4:68:f5:d9:11:8a:82:f8:a4: c6:59:9b:82:28:2c:7c:72:1b publicExponent: 1048577 (0x100001) privateExponent: 00:bd:2e:ab:b0:33:d0:38:db:c7:08:71:50:52:68: bc:05:c5:8f:9b:c9:0a:8a:26:59:3c:df:f0:24:d3: c0:ba:68:18:5c:f9:c4:28:be:54:5d:59:44:50:20: 3c:67:42:e7:ff:ef:79:14:04:7a:8b:47:74:64:3a: b2:75:a2:c2:ad:7c:11:4c:a5:48:89:2b:86:fa:e5: 6e:bd:2e:04:d6:e9:34:70:ef:d2:57:f8:cf:5d:93: 57:ba:b2:2a:3d:fd:3a:f0:88:27:4c:e5:5b:77:b9: cc:b1:a0:4e:8a:fa:f4:51:38:49:e8:24:c7:2e:a2: 1d:9d:08:4f:22:54:ed:ab:79 prime1: 00:fa:58:0e:cc:a1:cc:bc:38:d5:99:02:7e:2e:6a: d0:3a:fe:40:bd:13:ea:5e:27:7d:8b:1a:77:d5:c3: e8:13:09:f9:fc:9c:b8:db:15:e8:8b:39:03:74:66: ef:9a:03:e5:a5:38:af:51:b0:2d:e0:fb:90:f1:b9: 45:00:f5:da:6f prime2: 00:ca:bd:4f:7b:09:86:08:95:81:28:65:38:a7:fe: c6:bb:d7:5c:3a:95:ca:c0:cb:6d:97:8f:aa:f6:18: 91:07:8e:18:c8:5d:02:30:f8:fa:7c:87:53:41:6d: 80:0d:3b:ae:6d:ff:3a:33:a4:e4:61:e0:6b:bd:8f: d1:1e:e6:69:15 exponent1: 00:d7:1b:cc:85:a7:de:88:dd:0d:3b:00:88:ab:e9: cc:dd:93:d9:d7:39:97:55:fd:89:47:c5:d1:ab:98: 92:97:92:d1:0c:19:b9:34:e4:67:da:1a:27:8e:4a: 59:cc:38:ec:77:40:c5:70:ac:82:e1:20:fa:a1:23: ff:70:6b:49:01 exponent2: 59:50:33:aa:45:b5:a4:35:38:50:5e:e0:59:4d:de: 6a:1a:a7:2a:d1:91:d2:69:10:bb:13:39:e4:71:b0: be:cb:bc:7c:aa:77:60:38:fc:df:63:94:86:49:ab: 64:59:ac:20:30:cd:59:fa:e6:8f:72:c3:27:68:24: 6e:9d:44:71 coefficient: 00:e0:01:b8:44:3e:26:66:05:dc:ab:6d:07:cf:63: 0b:72:25:ce:3e:8f:d6:61:be:f4:c9:57:b1:a3:b4: 7d:e4:7f:20:7d:5b:25:27:aa:d6:07:8f:0e:46:3e: 76:ba:15:e1:67:25:1b:10:3e:7b:87:1d:28:e1:79: 03:de:cc:96:ab
从文件读取
从文件读取然后创建密钥,特别是区分公钥和私钥。我们只学了两个函数,分别用于读取公钥和私钥 PEM_read_RSA_PUBKEY、PEM_read_RSAPrivateKey。这两个函数的大小写怪怪的,考试前要记一下,因为不同格式的 PEM 文件要用不同的函数读取。
1
2
3
4
5
6
7
8
9
10
11
12
13
14
15
16
RSA *createRSAWithFilename (char *filename, int is_pub) { FILE *fp = fopen (filename, "rb" ); if (fp == NULL ) { printf ("Unable to open file %s \n" , filename); return NULL ; } RSA *rsa = RSA_new (); if (is_pub) { rsa = PEM_read_RSA_PUBKEY (fp, &rsa, NULL , NULL ); } else { rsa = PEM_read_RSAPrivateKey (fp, &rsa, NULL , NULL ); } fclose (fp); return rsa; }
给出完整的加解密代码:
1
2
3
4
5
6
7
8
9
10
11
12
13
14
15
16
17
18
19
20
21
22
23
24
25
26
27
28
29
string RSA_Encrypt (string plaintext, string pub_key_file) { FILE *f = fopen (pub_key_file.c_str (), "rb" ); if (f == NULL ) { printf ("load public key failed!" ); } RSA *key = RSA_new (); key = PEM_read_RSA_PUBKEY (f, NULL , NULL , NULL ); if (key == NULL ) { printf ("generate public key failed!" ); } unsigned char *cipher = (unsigned char *) malloc (RSA_size (key)); int cipher_len = RSA_public_encrypt (plaintext.length (), (const unsigned char *) plaintext.c_str (), cipher, key, RSA_PKCS1_PADDING); return string ((char *) cipher, cipher_len); } string RSA_Decrypt (string ciphertext, string pub_key_file) { FILE *f = fopen (pub_key_file.c_str (), "rb" ); if (f == NULL ) { printf ("load private key failed!" ); } RSA *key = RSA_new (); key = PEM_read_RSAPrivateKey (f, NULL , NULL , NULL ); if (key == NULL ) { printf ("generate private key failed!" ); } unsigned char *plain = (unsigned char *) malloc (RSA_size (key)); int plain_len = RSA_private_decrypt (ciphertext.length (), (const unsigned char *) ciphertext.c_str (), plain, key, RSA_PKCS1_PADDING); return string ((char *) plain, plain_len); }
RSA 签名
我们知道私钥用于签名,公钥用于验证。我们可以使用内置的函数,更加方便,也更加实用。
1
2
3
4
5
6
7
8
9
10
11
12
13
14
15
16
17
18
19
20
21
22
23
24
25
26
27
28
29
30
31
32
33
34
35
36
37
string sign (string data, string private_key_file) { FILE *f = fopen (private_key_file.c_str (), "rb" ); if (f == NULL ) { printf ("load private key failed!" ); } RSA *key = RSA_new (); key = PEM_read_RSAPrivateKey (f, NULL , NULL , NULL ); fclose (f); if (key == NULL ) { printf ("generate private key failed!" ); } unsigned char *sig = (unsigned char *) malloc (RSA_size (key)); unsigned int sig_len; if (!RSA_sign (NID_sha1, (const unsigned char *) data.c_str (), data.length (), sig, &sig_len, key)) { printf ("sign failed!" ); } return string ((char *) sig, sig_len); } string verify (string data, string signature, string pub_key_file) { FILE *f = fopen (pub_key_file.c_str (), "rb" ); if (f == NULL ) { printf ("load public key failed!" ); } RSA *key = RSA_new (); key = PEM_read_RSA_PUBKEY (f, NULL , NULL , NULL ); fclose (f); if (key == NULL ) { printf ("generate public key failed!" ); } if (!RSA_verify (NID_sha1, (const unsigned char *) data.c_str (), data.length (), (unsigned char *) signature.c_str (), signature.length (), key)) { return "verify failed!" ; } return "verify success!" ; }
对称密码
因为课堂教学顺序是这样,所以我也放在最后了。
RC4
流密码是对称加密算法 ,加解密双方(基于密钥)产生相同伪随机流, 明文与伪随机流按位异或 加密。一种具有可变密钥长度 (1~255 字节)的流密码。它依赖初始的 256 字节状态数组(初始化为单位数组)开始迭代
KSA 算法:基于 K 置换状态数组
PRNG 算法:扩充状态数组,加密明文数据
1
2
3
4
5
6
7
string rc4_encrypt (string data,string init_key) { RC4_KEY key; RC4_set_key (&key,init_key.length (),(const unsigned char *)init_key.c_str ()); unsigned char * cipher = (unsigned char *) malloc (sizeof (unsigned char ) * (data.length ()));; RC4 (&key,data.length (),(const unsigned char *)data.c_str (),cipher); return string ((char *)cipher,data.length ()); }
需要注意两个地方,RC4_KEY 不能是指针 ,必须声明式结构体。接收密文的 buffer 必须提前分配和明文一样大的内存 。
DES
DES 是分组密码,将明文进行分组,将每个明文分组作为整体进行加解密。分组长度 64 位 ;有效密钥长度 56 位 。DES 基于 Feistel 密码结构,也就是
扩散:明文每一位影响密文许多位
混淆:隐藏密文与密钥统计关系
分组密码应用模式
ECB(Electronic codebook),每个分组都是各自独立加密的,不好隐藏数据的模式和统计特征。
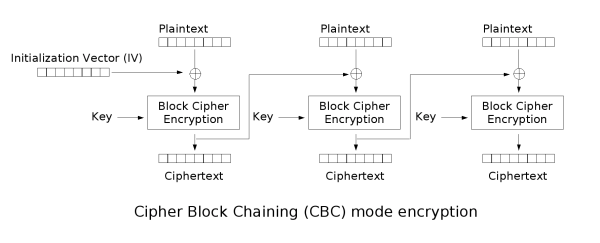
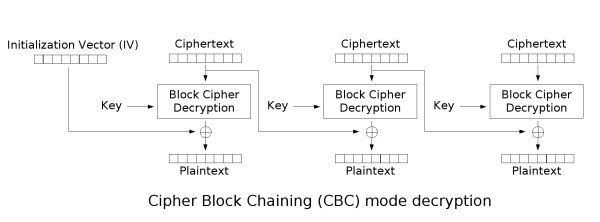
CBC(Cipher-block chaining),第一个块需要使用初始化向量,然后每个密文块依赖上一个密文块。串行加密,并行解密 。
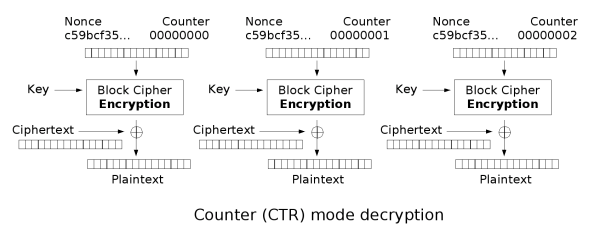
CTR(Counter mode),数器可以是任意保证长时间不产生重复输出的函数,但使用一个普通的计数器是最简单和最常见的做法。并行加密,并行解密 。
代码
核心就是记得 DES_string_to_key 之后再 DES_set_key_checked 生成另外一个密钥,加密函数的最后一个参数要写 DES_ENCRYPT 或者 DES_DECRYPT
1
2
3
4
5
6
7
8
9
10
11
12
13
14
15
void convert_string_to_des_block (string str, DES_cblock &output) for (int i = 0 ; i < 8 ; ++i) output[i] = str[i]; } string des_encrypt (string plain, string secret_key) { DES_cblock in_data, out_data, key; convert_string_to_des_block (plain, in_data); DES_string_to_key (secret_key.c_str (), &key); DES_key_schedule keys; DES_set_key_checked (&key, &keys); DES_ecb_encrypt (&in_data, &out_data, &keys, DES_ENCRYPT); return string ((char *) out_data, plain.length ()); }
SHA-1
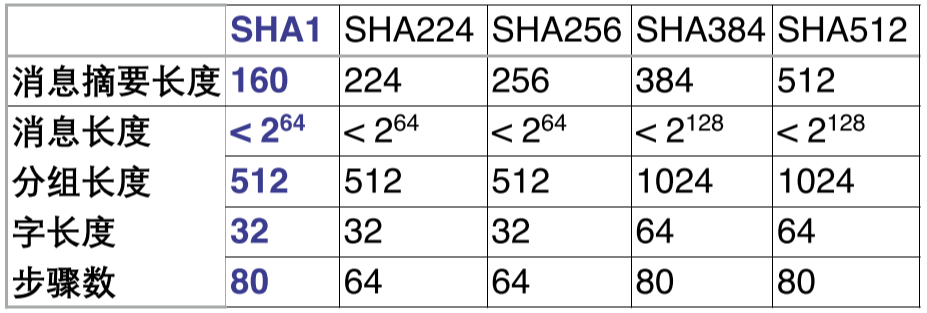
哈希函数单向 、抗碰撞 ,用于检测数据完整性 。考前要记住 SHA1,摘要 160 bit,分组 521 bit,80 次迭代。
代码挺简单的,注意缓冲区 20 字节就可以了。
1
2
3
4
5
string sha1_digest (string msg) { unsigned char obuf[20 ]; SHA1 ((unsigned char *) msg.c_str (), msg.length (), obuf); return string ((char *) obuf, 20 ); }